How to deal with images
Adding images to your calculator is a great way to make them more entertaining, and add breaks and comedy to what can otherwise be a boring looking wall of text.
In this section we will focus on four factors regarding the usage of images in our calculators: Selecting a good and legal image; making sure we don’t harm the user experience; editing the images to fit our needs; and, finally, how to properly store and access images.
Let’s take a quick look these four things, briefly so that we can all have a common ground from which to build awesome calculators!
Let’s not get sued, shall we?
Choosing an image is arguably the most important part of the whole process, and sometimes the easiest. When deciding on an image to use we have to consider two main factors: the legal side of things, and the creative side of things.
In legal terms we have to use images with no copyright restrictions on usage. How to know this can be extremely complicated if we’re looking at a random image on the Internet, so let’s work smart here. There are basically 2 paths to take here: the google restricted search or the image library way.
Google restricted searches
When searching images on Google, Yandex (awesome for finding similar images) or any other search engine, you will find all types of images from many different sources. Searching like that can lead to falling in love with a picture that has restricted use and cannot be included in your calculator. Sad.
Many of these engines, however, can filter images based on their license. Let’s look at Google as an example. If you search for images and the click on Tools-> Usage Rights you will be greeted with several options to select from. For our purposes both “Labeled for Reuse” and “Labeled for reuse with modification” [#1]_ will fit our requirements. Just remember to modify the image you took if the license requires it.
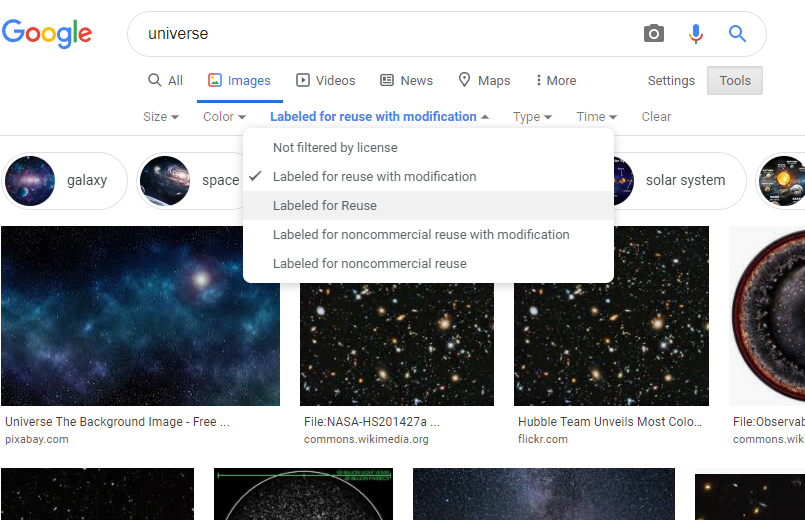
You can use Google’s search Tools to filter images by license.
Using free libraries
If you cannot find what you’re looking for on Google (really? you sure it exists, brah?) there is still another way to find your images. There are several websites specialised in stock imagery that offer high quality pictures for free without any restrictive license attached to them. Most require no account or payment, while some may require to create a free account, and some even require a paid account to access their service.
In pretty much all cases the free websites have enough material to satisfy our needs, so there’s not need to worry orpay for anything.
Here is a list of some common site where you can find usable pictures:
https://sp.depositphotos.com/ [We have paid account here, but try the free options first]
Lastly, I wanted to add a bit of an odd-ball here: Wikipedia It is technically not a stock-image website, but all their picture fall under the Creative Commons license (that allows for free reuse with attribution) and they have some amazing visuals for many complicated and scientific topics.
The obesity pandemic, img edition
Once we have jumped over the “licence” hurdle, we still to jump another one: size. Because of the emphasis that search engines place of page speed (in particular Google and in particular lately) and how loading times affect user’s experience, we have to limit ourselves to small images.
The guideline is to never exceed 100kB per image. There might be exceptions to this rule (maybe marketing calculators, extremely important images…) but they all need to be approved by someone else, so do your best to stay lightweight.
Sometimes, however, it is not possible to find the right image and you just need to make due with a big-ass image that exceed the maximum size by a factor of 100 (or even more). Do you have to choose between a faster page or a pretty page? NOPE!
Technology to the rescue! Images can be edited, shrunk and cropped to make them fit our needs. Let’s see common ways to do that.
Don’t make the rules fit the image, make the imagine fit the rules
Of the many ways we have of editing an image to reduce its size, three stand out as the simplest and fastest to use: cropping, compressing, shrinking. All of them should be available in almost ANY photo-editing software, so by all means, use whatever you’re most comfortable with.
Cropping
Cropping is the simplest of them and it’s the virtual equivalent of taking a pair of scissors and chopping off parts of the image you have. This works best for images slightly over to the 100kB limit or those with excessive and useless information for our purposes. You might also choose to divide an image into several making each of them smaller, this works for certain infographics or images that contain several stages of a process… I think you get it.
Shrinking
Shrinking is exactly what you think it is, only it’s a bit more complicated to imagine in a virtual world. Shrinking is basically reducing the resolution (the number of pixels) of an image. Less pixels means less information meaning smaller file size. Given that many of the images online are displayed on a phone, we can reduce greatly the size of a picture by simply getting rid of information that no human will ever notice anyway.
Compressing
This is the conceptually more complicated process. Instead of getting rid of information, we simply try to store it more efficiently, so that it takes up less space. In theory, this is brilliant and does not require any loss in quality, but in practice we generally tend to sacrifice a bit of quality when compressing and image so that we massively reduce the space needed to store it. We’re a science and education website, not an art gallery :)
How to do it
Here are some online and offline tools to help you shrink, compress and crop images to your heart’s content:
https://pixlr.com/es/editor/ [Online]
https://tinyjpg.com/ [Compression Only]
https://tinypng.com/ [Compression Only]
https://www.gimp.org/ [Offline]
On formats and other media
When it comes to preferred formats online, there’s not a huge different between image formats. As a rule of thumb, at Omni we favour .svg when possible (it’s vector graphics, so no photos); if not possible or if there are equations involved (seem to create compatibility issues in some browsers) we then lean into .png format; and, finally, we can always count on the “fine”-Old .jpg to have our back. Just, please, don’t go our of your way to convert from one to another, it’s just not worth if you already meet all the other requirements of size, license…
When it comes to animations, we try to avoid them whenever possible. If there’s a good way to have an explanation just using static images, let’s do that and avoid any performance penalties. However, if you must use animations, we prefer .gif over embedded videos for they are faster to load.
Nevertheless, GIFs are subject to the same restrictions as the rest of the images with licensing and size being the most important ones. Since animations tend to be heavier than static images, here is an online tool that lets you optimise your GIFs by compressing, shrinking, cropping and even reducing the frame rate of the source file. Legend has it that the Wizard of Czernia once reduced a 50MB GIF into just over 700kB with very little quality loss by using this tool:
https://ezgif.com/ [Online]
How to store your images
When storing images we can either link to the website where we find it, or upload it to our FTP server. The easiest one is to link directly from another website, but it’s also the most dangerous one as we will be dependent on that website staying alive for as long as we need their image. The general advice is don’t do this with Wikipedia being a notable exception to the rule.
When it comes to using our own FTP server, it takes a couple more steps but they are certainly not complicated. If you don’t remember them, you can always find the guide on our Google Drive’s folder. Just look for the file named Shared accounts in the Omni Common folder.
Now let’s have a real talk moment, please. If you have ever tried to find a picture in the FTP images/ folder, you probably know how messy it is. Some of us might find ourself oddly comfortable diving into a mess of an organised crap that resembles our own room more than it resembles any kind of archival, but this is NOT a good thing!
To try to fix this problem, or at least prevent it from getting even messier than it already is, we have created a short guideline on how to store, organise and name images that will be used in our calculator. Three simple steps to avoid chaos and all its problems.
A guide on storing files in our FTP server
Folders to organize common topics
If you are storing images for a calculator that belongs to a broader topic for which we have multiple calculators, find/create a folder for that topic. Examples can be things like Geometry, Cube, Astronomy, Ecology, Coronavirus… If necessary, subfolders should be created/used to keep things organised.
If your calculator has many images, it needs a folder
If you find yourself storing more than 4 (arbitrary number to be used as reference) images for a single calculator, it’s a good idea to create a new folder to group them all.
Name pictures like they are variables
I don’t mean camelCasing (though I’d love to have it that way). What we mean is that you should give your pictures descriptive, clear and unique names. It never hurts following some kind of naming scheme. This is the one we recommend you use, so feel free to use it.
File name logic: [INITIALS]-[CalculatorIdentifier]-[pictureDescriptor].[Extension]
File name example: Al-hist-histogramExample.png
tl;dr
So let’s assume you haven’t read any of the above and you cannot be bothered to. What do you need to learn from this text?
Choose pictures with a license that allows for reuse.
Make sure your pictures and animations are at most 100kB.
Edit your pictures if necessary to comply with the rules above.
If you’re storing pictures in our FTP server, use folders for organization and organise them in folders.
Footnotes
- 1
Don’t ask me about the capitalisation of those options… that’s on Google (hint: they are american)