Groups and variables
The Groups and variables section defines the layout of the calculator variables, their units and other properties and attributes.

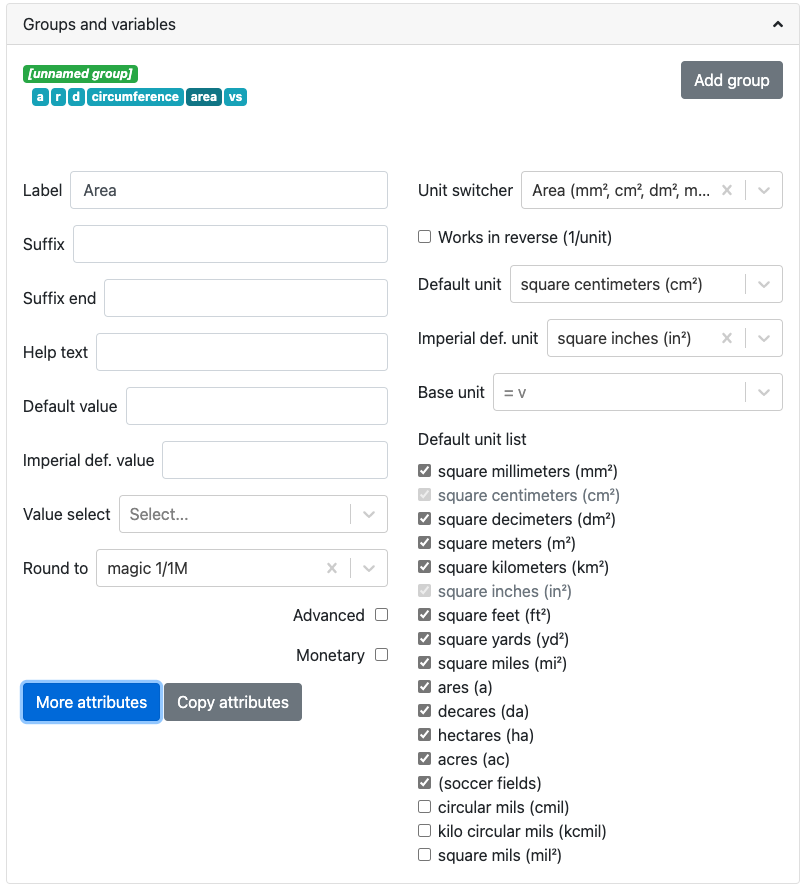
An example of the Groups and variables section of the edit calculator page.
In the screenshot above, green labels are groups and blue labels are variables. You can drag and drop them to move them around and to change their order. After a few seconds, the calculator preview will update to reflect the changes you have made.
Variables are added to this section when they are either entered into an equation or added to the Additional variable names list and the calculator is saved.
Groups

This is how the Groups and variables section looks after pressing the Add group button.
To add a new group, press the Add group button. You can then give it a name if you like, which will be used as the heading for its variables in the calculator. If you don’t give it a name, it will be an unnamed group and no heading will be shown in the calculator.
To add variables to a group, simply drag and drop them so they are under a group.
To remove a group, click on it to select it (turns dark green) and press the red Remove group button.
Tip
You can move groups of variables around by dragging and dropping them, just like variables.
Variable attributes

Click on a variable to display its basic attributes.
Click on a variable to select it (turns dark blue) and its properties/attributes will be displayed (as above). If you click on another variable, then its attributes will be displayed. To hide the attributes, click on the variable label again.
Here are is a summary of the DOs and DON’TS when it comes to variables:
DO capitalize the first word in each variable (but not more);
DO capitalize the first word in every header;
DO try to list the variables in a logical order; information supplied by the user should be at the top, the result — at the bottom;
DO make sure that you’re not using more units than necessary - uncheck any you don’t need from the variable’s unit list; and
DO spend a few seconds thinking about the default unit and the Imperial default unit - which ones will make the most sense?
Let’s now go through each of the variable attributes to see what then do.
Label
This is the name of the variable as displayed to the user. Make sure it will be easily understood by the user and starts with a capital letter (but no more). If the variable is associated with an equation in the calculator text, it’s a good idea to put the algebraic reference in brackets after the name.
Suffix
The suffix is a piece of text that is placed before any units symbol. This can be useful when creating a compound unit where the first one is fixed.
It can also be used to quickly add a unit where there is only one choice.
Suffix end
The suffix end text gets placed after any units symbol. Again, this is useful for creating compound units where the second part doesn’t change. E.g., dollars per day ($/d) — so suffix end would equal “/d”.
Help text
Text inputted here will appear as a tooltip when the user hovers over the variable label. This allows you to describe in more detail what input is required, say what limits there are on its value or better explain a result. Guidance on help texts can be found here.
Default value
You can specify a default value for the variable, given in its default unit.
Imperial def. value
Set a default value for users in countries who use the Imperial measurement system (e.g., the US). The value should be given as the Imperial default unit.
Generally, if you have set a default unit and you have specified an Imperial default unit, you should set an Imperial default value. Otherwise, your calculator may not work as expected in Imperial unit countries.
Value select
If the variable is to be a dropdown menu, rather than a number, here you select which value select to use. Value selects are defined in the Value select section of the edit calculator page.
Round to
Here you can select the rounding of variable values. You have a choice of different levels of relative rounding (the magic 1/n ones) or 0 to 10 decimal places.
Magic rounding
Magic rounding means that the difference between the rounded and original number may not be larger than 1/nth (for example 1/100) of the original number.
Magic rounding is relative — it works differently on large numbers and small ones. The flaw of regular rounding is that while it’s OK to round 1.55334 to 2 decimal places, it’s far too precise to round 9992383829238.234234234 the same way and far too imprecise to round 0.0000000000023423 like that.
Let’s have a look at the effect of different magic rounding settings on the number 2/3 and 4444.444 recurring.
Round to setting |
2/3 becomes… |
4444.444 recurring becomes… |
magic 1/10 |
0.7 |
4,444 |
magic 1/100 |
0.67 |
4,444 |
magic 1/1k |
0.667 |
4,444 |
magic 1/10k |
0.667 |
4,444 |
magic 1/100k |
0.66667 |
4,444.4 |
magic 1/1M |
0.666667 |
4,444.44 |
magic 1/10M |
0.6666667 |
4,444.444 |
The default setting for the Round to attribute is magic 1/10k, when no option is specifically selected.
When choosing magic rounding and you don’t like the default setting, have a play around with entering different values into the calculator and seeing the results. We don’t want them too long or too short for the typical usage of the calculator.
Tip
🤑 For monetary values, it’s usually a good idea to round to two decimal places.
Advanced checkbox
Checking this option puts the variable into advanced mode only. If any variables are in advanced mode, the calculator will gain an advanced mode button underneath it. When this button is pressed, variables with this checkbox checked will appear. Go back to simple mode and they will disappear.
Unit switcher
Choose the units for the variable from the list. Start typing in the unit switcher name to find the one you are looking for.
Unit switchers can be edited and added to the unit switcher page. However, it is best to ask someone before making any changes, as they might affect other calculators.
Works in reverse checkbox
Check this box if you have a variable where the unit is the reciprocal unit. For example, wavenumber has units of m-1. This example can be found in the wavelength calculator.
Default unit
Set the default unit of the variable from the dropdown list. A default unit always needs to be specified.
Imperial def. unit
Set an optional Imperial default unit. This will be the default unit displayed to users in countries that use the Imperial measurement system, e.g., the US.
Base unit
This is the base unit in which calculations are performed. Usually this can be left to the default base unit of the unit switcher (e.g., meters for the length unit switcher).
However, if you have an equation based on feet, you can specify to use feet as the base unit. This has the advantage of not having to rewrite the equation for meters (a problem if the equation contains constants).
Warning
If the calculator contains a value setter in the CustomJS code, you should explicitly set the base unit, if even it is the default (e.g., specify meters for the length unit switcher). This makes sure that those users in Imperial unit countries will get the correct value for variables set by the value setter.
Default unit list
For each unit switcher, a list of all its units are displayed. Depending on the application, some units will make sense, while others won’t (e.g., somebodies weight in terms of solar masses). Check the units you want the user to be able to choose from, and uncheck others to hide them.
Note
You will see that the default unit and Imperial unit (if set) are greyed out and cannot be unchecked.
If you make a change to the list of units, a reset button will appear at the top. This resets the unit list to the default list for that unit switcher.
More variable attributes
Click on the blue More attributes button to show even more variable attributes. Let’s explore them next.
Click on the More attributes button to display even more attributes of the current variable.
Note
To hide the extra attributes, click on the blue Less attributes button.
Auto saved
When checked, the variable value will be saved in a cookie on the user’s browser. So, next time the user comes back to the calculator, the last value they entered will be already displayed.
This is useful for things that are not likely to change very often or by much, such as a person’s age, weight, etc.
Locked
The variable will not be recalculated as other variables are changed and the user cannot enter its value. This is good for variables that are meant to be outputs only.
The user can override this setting in the variable menu (displayed when you click the grey area to the right of the variable.
Locked permanently
Same as the locked function above, but now the user cannot override the setting.
Don’t format
When checked, formatting will not be applied to the number after the user has finished entering the number. For example, the number 123456 is usual displayed as 123,456. With formatting turned off, it’s displayed as 123456.
This is useful, for example, if you have a binary input variable, so using the thousand separator doesn’t make sense.
Field type
This sets the type of the variable. Here are the currently available types:
default— Regular numbers. This is the setting for the majority of variables.date— Allows the user to enter a date, using the calendar date picker or by typing one in manually.date \ time— Allows the user to enter a date and time.time— Allows a user to enter a time, either using a time picker or entering it manually.
Note
Dates and times are actually numbers in the UNIX time format.
Copy attributes button
If you have a calculator with many variables with very similar attributes, such as unit switcher, custom unit list, rounding, etc., it can get pretty tedious to set them all up.
Don’t worry! The Copy attributes button is here to save you a load of time.
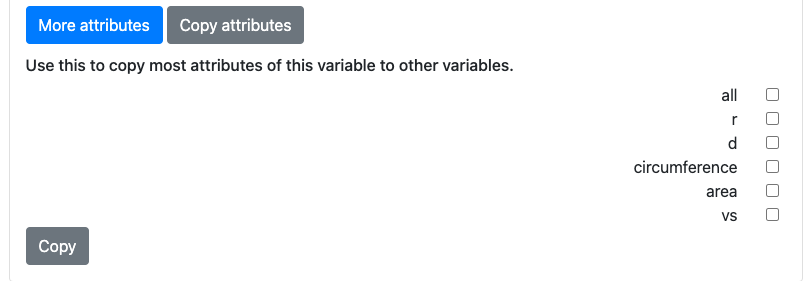
Click on the Copy attributes button to be able to copy most of the current variable’s attributes to other variables.
After clicking the Copy attributes button, a list of the other variables in the calculator will appear. Check each one you want to copy this variables attributes to. Then click the Copy button to copy the attributes.
Note
This feature will copy most of the attributes, but not all of them. [WAITING FOR A LIST]